Colorful Chair Up Date

Friday, July 17, 2015


     The craft room has been shaping up nicely even though it has been going to slow for me. I found a fabulous chair for $15.00 at an estate sale that just needed a little love to be perfect. The wonderful women who started the Fab Furniture Flippin Contest created another opportunity to splash some color in my craft space.
                  
Our  Hostesses for this month are
Stacy of
 Lynn of
The remaining creative team 

        This month has been sponsored by Unicorn Spit and the theme is color.

Shedding Some Light On The Craft Room

Monday, April 20, 2015

 This lamp from Good Will is the perfect height I wanted for my desk in the craft room. Here she is with her blue shade, rocking those dangling beads in an awkward original state.
Now watch how she transforms into a beautiful addition to my craft room.
Before, Lamp,Good Will, Blue Shade, Gold, Black, Tall, Thrift, Beads
Yep! craft room mess and this is progress. You can see the floor.
I purchased a lamp from a wonderful designer friend of mine for my craft space at the lake house. Click here The Tour Through Blogland is Live with Three New Bloggers! to see my inspiration, learn a little about me and a few friends.  I used it as inspiration to put my personal touch on the lamp for the craft room in Illinois.
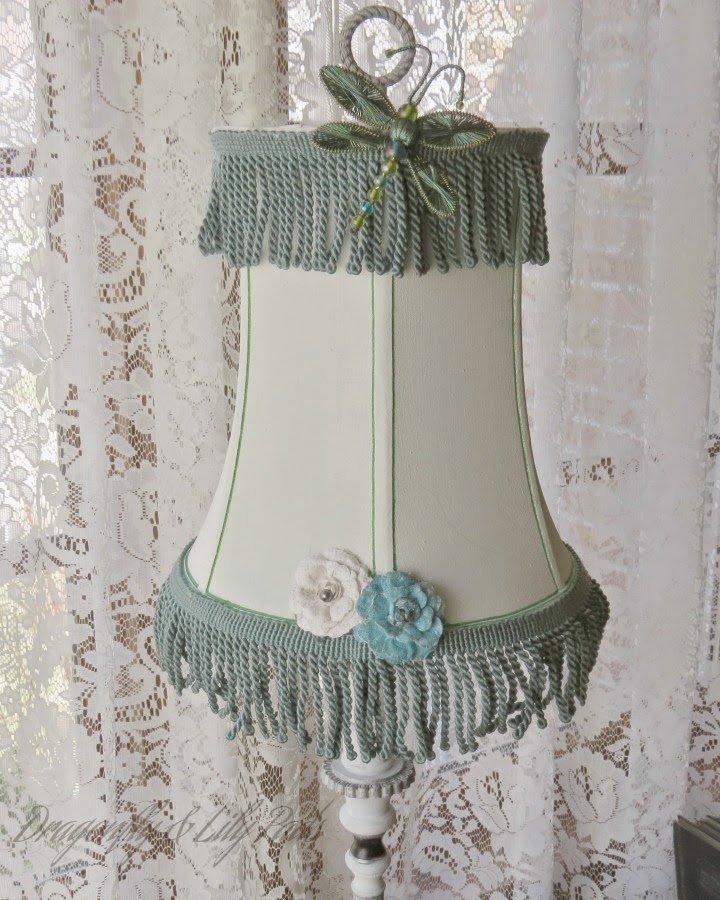
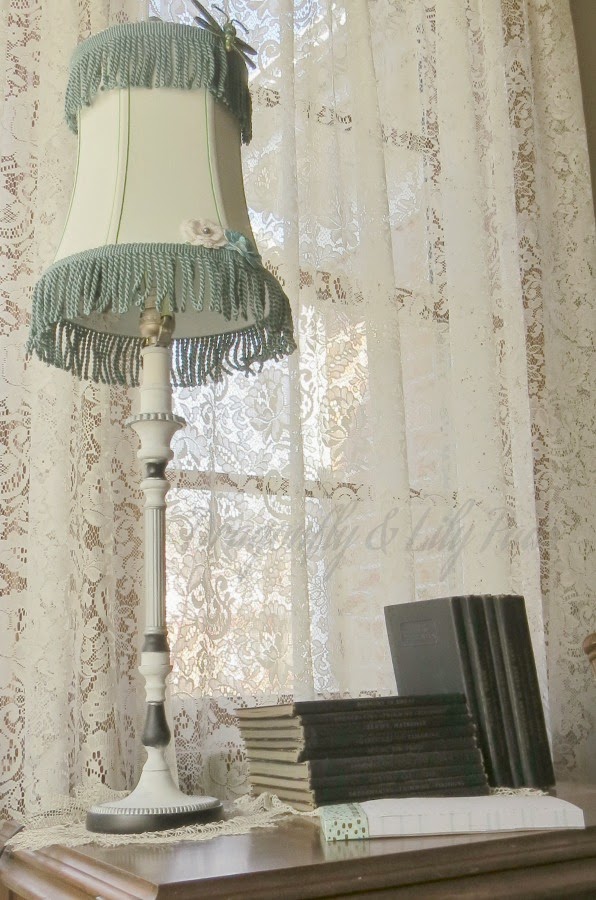
                    After, Lamp, Chalk paint, White, Green Stripes, Dragonfly,Blue Fringe, Flowers,
 The design of the lamp went through a metamorphosis of sorts starting with the planning process to purchasing and then even completion. The supply list changed several times as I tweaked, painted, glued and pinned different pieces to her. She even ended up with part of a napkin ring on here which changed part of her color scheme and materials. When you look at the pictures you will see crystal I never used and beads from necklaces. The fringe was on clearance I bought for a pillow. I think the pillow leftovers look great on my lamp the crystals would have been all wrong. 
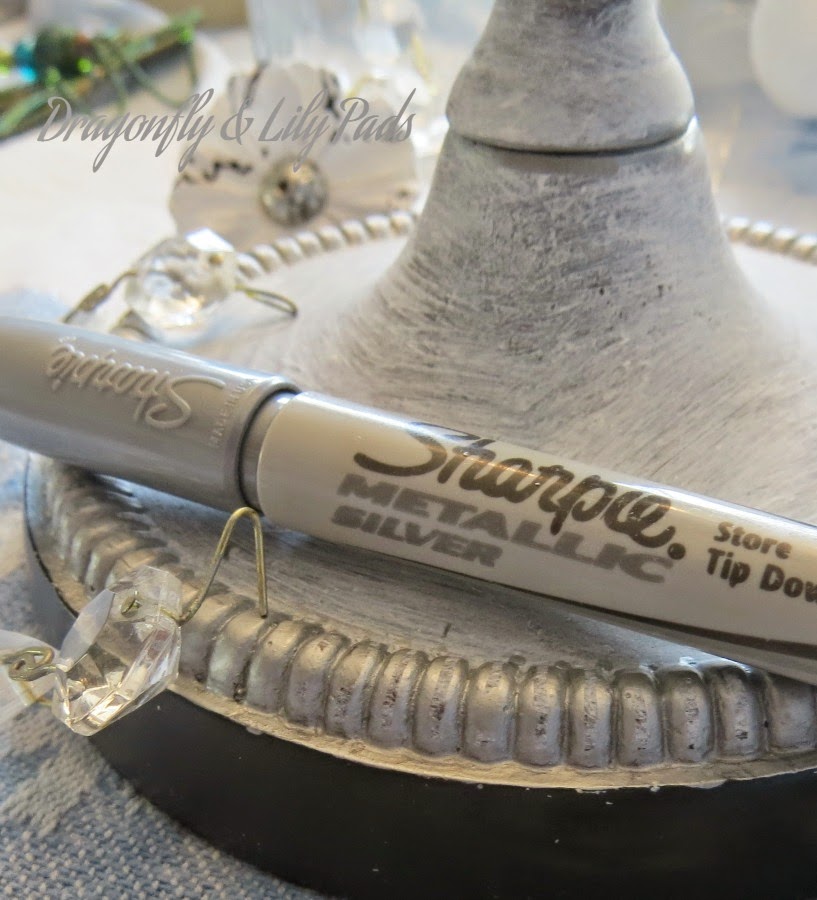
Lamp Base, After, White, Black Silver Sharpie Metallic Marker, Print Flower
White chalk paint left over from a project gave the lamp and shade a clean crisp look. 
I kept the black and added highlights to the details on the lamp base with a Silver Metallic Sharpie Marker. 
After, White, Lamp shade, Dragonfly Napkin Ring made into Shade embellishment 
The dragonfly was a napkin ring I cut of the ring with wire snips and hot glued the dragonfly to cover where the fringe meets, When you look closely I also painted the finial white and silver. The thin green lines on the shade are two shades of Sharpie Markers tying in the green of the dragonfly.
Flowers, Inside Lamp Decor, Silver, Grey, Gray, Print White
 My friend has some sweet tricks up her sleeve and this is one of my favorites. If your sitting down your probably going to see the inside of the shade. I love that ideas to make all angles pretty. So I added a few paper flowers and a felt rose pin from another thrift store. The center of the back flower was gold. Silver marker made it into a match and of course I had to add a little sparkle.
After, Good Will, Lamp, up-cycle, Fringe Dragonfly, Paint, Marker, Flowers, Napkin ring, Dragonfly
 It is all in the details.
 I love the new addition to my craft room.  This s my grandmother's sewing machine in my living room the light in the basement is "terrible".  Another treasure from my grandmother is her antique books. They are a series on how to learn to be a good home maker. I really should read them some day. I have read snippets of some. They are very funny compared to our world today. LOL
 I am extremely grateful to all of you have been checking to see what is new while I have been busy. I have been working on projects, the back end of the blog and preparing for my first blogging conference called Snap. Working on projects you can see what I have been doing. To non-bloggers the back end of a blog means computer work that sends all this magic I create to you. 
 The Snap Conference I will be writing about when I return home. It is for bloggers to learn more exciting possibilities to bring to you on this very site. Follow my Instagram, Twitter and Facebook to see some of the action during the conference. I be sharing the fun, work, and education I have obtained to keep improving my skill set to bring you current information useful in your home.
 Who is going to give lamp a re-vamp for a room in your house? 
I would love to see the pictures of what you create for your home. Link below and share what you have been inspired to create. As always you know I love your comments so don't forget to write!

Fly along my blogging journey with me (Click links below to Connect)                            
     
                 Pinterest   Facebook    Google +  Twitter   Instagram   BlogLovin

 ~ Let Your Creative Spirit Dance  ~

Until Next Time Happy Creating, 
         Karen Marie

Ikea Computer Cabinet Transformed Into Craft Cabinet

Friday, January 23, 2015

     Part of my Dancing in the Craft Room plan was to convert my computer cabinet to becoming a hard to recognize craft cabinet. I am thrilled to have +DecoArt  sponsor the plan to take a pine +IKEA USA computer cabinet that we no longer used into a craft cabinet. This was my first time and they said yes! I will include a list of supplies I purchased and sponsored provided at the end of the post.
Before Ikea Computer Cabinet, Tuesday Morning Rug, Color Inspiration
 The Before picture of the Ikea computer cabinet with the  rug purchased at +Tuesday Morning is the color inspiration for Dancing In The Craft Room II.
Ikea Cabinet DecoArt, Decor Americana Chalky Paint Finish, First coat Treasure
 The first coat already looks beautiful. I could have stopped here. I love the color named Treasure. This cabinet has to compliment our family room colors. I need to tone it down to better suit the area. Look closely through the next few posts to see where I kept that bright color I love in the cabinet.
DecoArt Story board for cabinet transformation, Vintage, Relic, Treasure, Layers, Decor Vintage Key Stencil
            This represents my story board of paint color and stencil from DecoArt.

Dancing In The Craft Room II

Thursday, January 15, 2015

     I started my Craft room last year with the enthusiasm of a child playing with a new puppy. Sometimes no matter what our goal in life is God has another plan. In this case this plan would change my whole families life. We chose to help people we loved with overwhelming health trouble. The good news is they are safely in good place now and we are hoping for the best.
Americana Decor Chalky Paint, DeocArt Supplies, Wooster Paint brush, Stencil from DecoArt
Ikea Computer cabinet painted one coat of Chalky Paint from DecoArt
Rug from +Tuesday Mornings that inspired colors for Dancing in The Craft room.


   Dancing In The Craft Room post was posted on May 1, 2014. I was so excited to know that I was going to develop my own space. This is a dramatic moment for me to read how long this has been on the back burner.

The Best of 2014 a Year Review!

Wednesday, December 31, 2014

  This is my first year in review since I started blogging. I am excited to bring you the top ten posts of the year. Together we have accomplished more then I ever dreamed of when I started Dragonfly & Lily Pads in October 2013. I want to thank each of you for support.  As this year ends I have a sense of relief, excitement, and a positive outlook for the coming year.
Why relief you ask? Because we all have times that our life takes us in a totally different direction. I believe in helping when there a need from some one you love. Family has taken on a whole new meaning to us this year.
Excitement now your wondering? Making that day in Oct. 2013 count as Something New each day by writing DNLP blog. This blog is a bit of a gift to myself, as I express my creativity, share my love by inspiring others, and transforming all of us into the people and lifestyles we strive for in everyday life.
   OK! A little deep I  know but, it is truly how I feel.
Positive outlook is pretty easy because, this year has been a difficult year outside of these pages. 2015 is going to be different. I have learned a few valuable lessons about who I am and where I want to be this coming year. I will be sharing more about these goals during the coming year.
Today is about the closing the past year 2014 and opening a new door to 2015. Choosing what I want to carry with me as hard taught lessons, and what to Let Go! Yeah I went there...LOL
  Today I am sharing the top ten posts of the year chosen by you .
Sweet Baby Love Quilt, Yellow, White, Gray, Giraffe, Elephant, Silhouette Cameo

A DIY Stenciled Inspiration Board

Monday, November 10, 2014

    We look for inspiration everyday, in many places. I have read about achieving your goals, by placing them on a board, and looking at it daily. A place to organize your thoughts, where, what & how will you get to your next goal. The far off future goals too. Now you can see where the idea for the DIY stenciled inspiration board came for this post. In my Fall Mod Podge Pumpkin post I mentioned buying two carts of goodies at +Michaels Stores. I bought several framed cork boards that were on a great clearance sale.
To be honest I struggled with what would be the best approach to make this board inspiring. Then in a series of unrelated life circumstances, I was in Pompano Beach, FL. looking for document boxes with Prince Charming.The Office Depot was having a clearance sale because, they were moving. I found what I needed at the store 30% off and Gelio Gel pens for 50% off. Hmm. This would work on the cork board but, now what should I stencil?
DIY Inspiration Board, Silhouette Flourish, #44437 Design,
I chose the inspirational phrase by Kolette Hall and +Silhouette America Flourish design.

The Tour Through Blogland is live with Three New Bloggers!

Tuesday, September 2, 2014

The Kim Six Fix has invited me to participate in The Tour Through Blogland. Which is fitting since we have met through blogland, Facebook, Twitter, Instagram, Pinterest and of course our blogs. She mentions in her post, we are alike in our blogs. We love DIY, constantly learning what, where, and how to use different tools to build or remodel. Then there is our softer side, which is decor, sewing, painting and crafting. One big difference is I am not a Scientist. I have a degree in Early Childhood but, both Kim and I became SAHM. One of my favorite segments on her blog is her Mantels. Look at Kim's talent in these photos then click this link to check out The Kim Six Fix.
Before & After of Kim's Bathroom
Kim's Back to School Mantel
Thank you Kim for the lovely introduction. You are a talented blogger, always willing to support others, and teach amazing tips to new bloggers.  :)
Who am I?

Dancing in the Craft room

Thursday, May 1, 2014

    This is a great time in my life. I am finally creating a craft room for me to celebrate my talents, in one place in our house. No more sewing on the kitchen table, a craft project balancing on our queen size bed, or cutting large projects on the living room floor. I am stealing a spot in the center of our basement just for me. My creative spirit has been dancing in my dreams for years. During the following weeks I will create the first room of my own. I will finally step into my room, start a project having all my equipment, material and notions in the spot I designed for me.
   I have been shopping, saving, storing, and designing a craft room in my mind for years. It is so exciting to realize my dreams using furniture collected over time that I will sew, paint, glue, scrapbook, my way to my happy place in our home.
  What are my plans? I have a computer cabinet from +IKEA USA , that will be re-worked into a station for my silhouette cameo, glue gun, along with storage. +DecoArt has been kind enough to provide +Americana Chalky Paint, a key stencil and sealer supplies. I plan on sharing several progress posts with you in the following weeks.


Create Craft Room Labels

Monday, January 13, 2014

Welcome to the First Silhouette Challenge of 2014

    This month we were asked to add a project which involved getting organized.  This is the first event I am participating in since I am a new member of this group. I am honored to share this page with others who share a passion for learning, growing, sharing ideas, all while using my favorite item in my craft room The Silhouette Cameo. Heck I liked it so much I bought two. 
   Today I am sharing a new project I have never done before with you. I am just starting to design my craft room at my White Picket Fence Home. This is my first time using the my printer, with the registration marks, then cut with the Cameo. I have to say I am amazed at how this machine works.
   Alright it is time for directions to success!!!!!

The first item on our list today is measure your length and width of the size of the labels you need. In my case the Recollection File Drawer is 2" wide and 1" high. Then I made one rectangle to these measurements. I hit fill page but felt that was to close for comfort, so I decided to leave a space between each label by duplicating and pasting to my desired  page. This way even if I was off on the printing it would still leave room to cut around the labels.
  I chose colors that coordinated so each type of supplies is easy to spot by color as well as words. here is the process in pictures.
This is how my page looked with rectangles and words typed in place. See below the screen has with the cut lines around the words Butterfly Clips. Since we do not want to cut these lines I have demonstrated the images to click on to remove theses cut line form the pattern. 
 Highlight the word Trims, then click The Scissor Symbol, next click No Cut  

Make sure you have the  registration  marks on and send to printer


This picture shows what the registration marks
look like on the printed page.
This is how the paper will look when it comes out of the printer                                                                    
Set your paper to 8 1/2" X 11" place on your mat as pictured above


        Follow the directions on the screen.
This is a picture of the Cameo processing the cuts.


 Set the blade to the right setting for the material you are cutting.
   
This is the way the labels look weeded.


This is the promise of a new Craft room and the Start of a many friendships through Silhouette Challenge.

Thank you for joining me during this tutorial. I hope this helps you move towards trying a new project yourself. Please share your comments and thoughts with me because, I Love to here from my readers and blogger buddies.


 On behalf of The Silhouette Challenge Team Welcome to 2014!
 Each Month we will be presenting a wealth of ideas and information to help you use your Silhouette Cameo or Portrait. 
Join Me in learning from 35 of my team members who posted to this Months Event!

January's theme is Organization


  1. DIY Window Shutter Mail Organizer by Weekend Craft
  2. Kids' Art Wall by Tried & True
  3. Organizing Silhouette and Craft Supplies by The Happier Homemaker
  4. Simple Recipe Organization by It's Always Craft Time
  5. Put a Label on it! Herb Names for Plant Stakes by Get Silvered
  6. Super Simple Linen Closet Labels by Two Purple Couches
  7. Beware of the Animals Vinyl Toy Box by A Tossed Salad Life
  8. Child desk accessories by Architecture of a Mom
  9. Organizing & the Important of Labels by The Turquoise Home
  10. Index Card Organizer for Easier Meal Planning by Chicken Scratch NY
  11. Create Craft Room Labels by Dragonfly & Lilypads
  12. Simple Storage Solution for your Christmas Ornaments by Vintage News Junkie
  13. Organize this: DIY Planner Covers, Tags & Dividers (made with Cereal Boxes) by Black and White Obsession
  14. How to Make a Cut File into a Print & Cut by Create & Babble
  15. Simple Chest Freezer Organizational Board by Nearly Handmade
  16. Vinyl Your Kitchen Canisters! by From Wine to Whine
  17. Nursery Closet Dividers & Silhouette Cut File by Creative Ramblings
  18. Make Custom Box Templates with a Silhouette for Drawer Organization by One Dog Woof
  19. Organizing the Craft Room by What's Next Ma
  20. Vinyl Wall Calendar by Crafts Cakes and Cats
  21. Personalized Toy Storage Bins by Lil' Mrs. Tori
  22. Personalized Routine Chart by Work in Progress
  23. Blog Planner Sheet Dividers + Free Cut Files by TitiCrafty by Camila
  24. Simple Project Calendar by Little Blue's Room
  25. Dry Erase Photo Frame Menu Board + Free Cut File by Essentially Eclectic
  26. Receipt Organization with Free Cut File by The Thinking Closet
  27. Cute and Easy Labels by Life After Laundry
  28. "What's For Dinner?" Menu Planning Board by unOriginal Mom
  29. Mixing Organization and Function: An Easy Conversion Chart by My Paper Craze
  30. Why do my cookies taste so bad? A lesson in baking. by The Life and Times of a TAP
  31. Custom Drawer Dividers by Please Excuse My Craftermath...
  32. The evolution of my labeling system by feto soap
  33. Ikea Drawer labels by McCall Manor
  34. Glass Etched Vinegar  & Oil bottles by Terri Johnson Creates
  35. Organize It: Bathroom Closet by The House on Hillbrook
  36. Ombre Butterfly Magnet Board by Sowdering About


Crafting is always Better with Friends

Show your appreciation we are all volunteers

Please feel free to Share but,
 always give the original post credit.

Blogging love is always accepted and appreciated,
 You know the drill Click away!