
Monday, January 13, 2014
Create Craft Room Labels
Welcome to the First Silhouette Challenge of 2014
This month we were asked to add a project which involved getting organized. This is the first event I am participating in since I am a new member of this group. I am honored to share this page with others who share a passion for learning, growing, sharing ideas, all while using my favorite item in my craft room The Silhouette Cameo. Heck I liked it so much I bought two.
Today I am sharing a new project I have never done before with you. I am just starting to design my craft room at my White Picket Fence Home. This is my first time using the my printer, with the registration marks, then cut with the Cameo. I have to say I am amazed at how this machine works.
Alright it is time for directions to success!!!!!
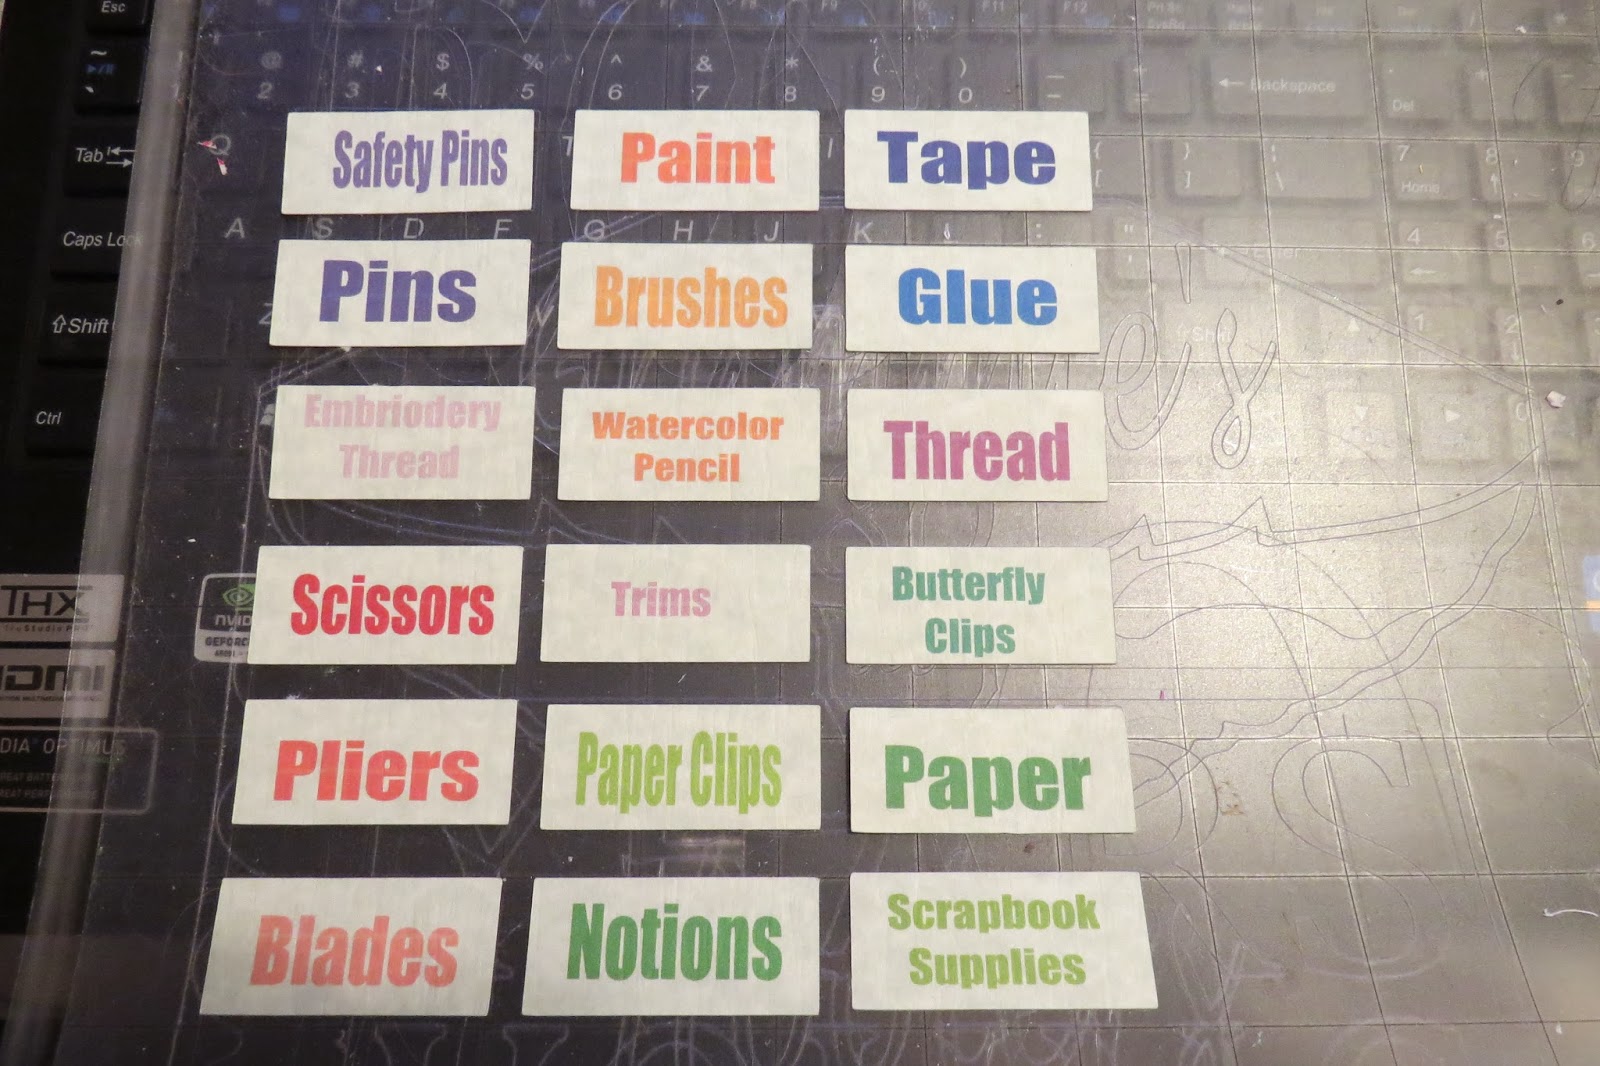
The first item on our list today is measure your length and width of the size of the labels you need. In my case the Recollection File Drawer is 2" wide and 1" high. Then I made one rectangle to these measurements. I hit fill page but felt that was to close for comfort, so I decided to leave a space between each label by duplicating and pasting to my desired page. This way even if I was off on the printing it would still leave room to cut around the labels.
I chose colors that coordinated so each type of supplies is easy to spot by color as well as words. here is the process in pictures.
 This is how my page looked with rectangles and words typed in place. See below the screen has with the cut lines around the words Butterfly Clips. Since we do not want to cut these lines I have demonstrated the images to click on to remove theses cut line form the pattern.
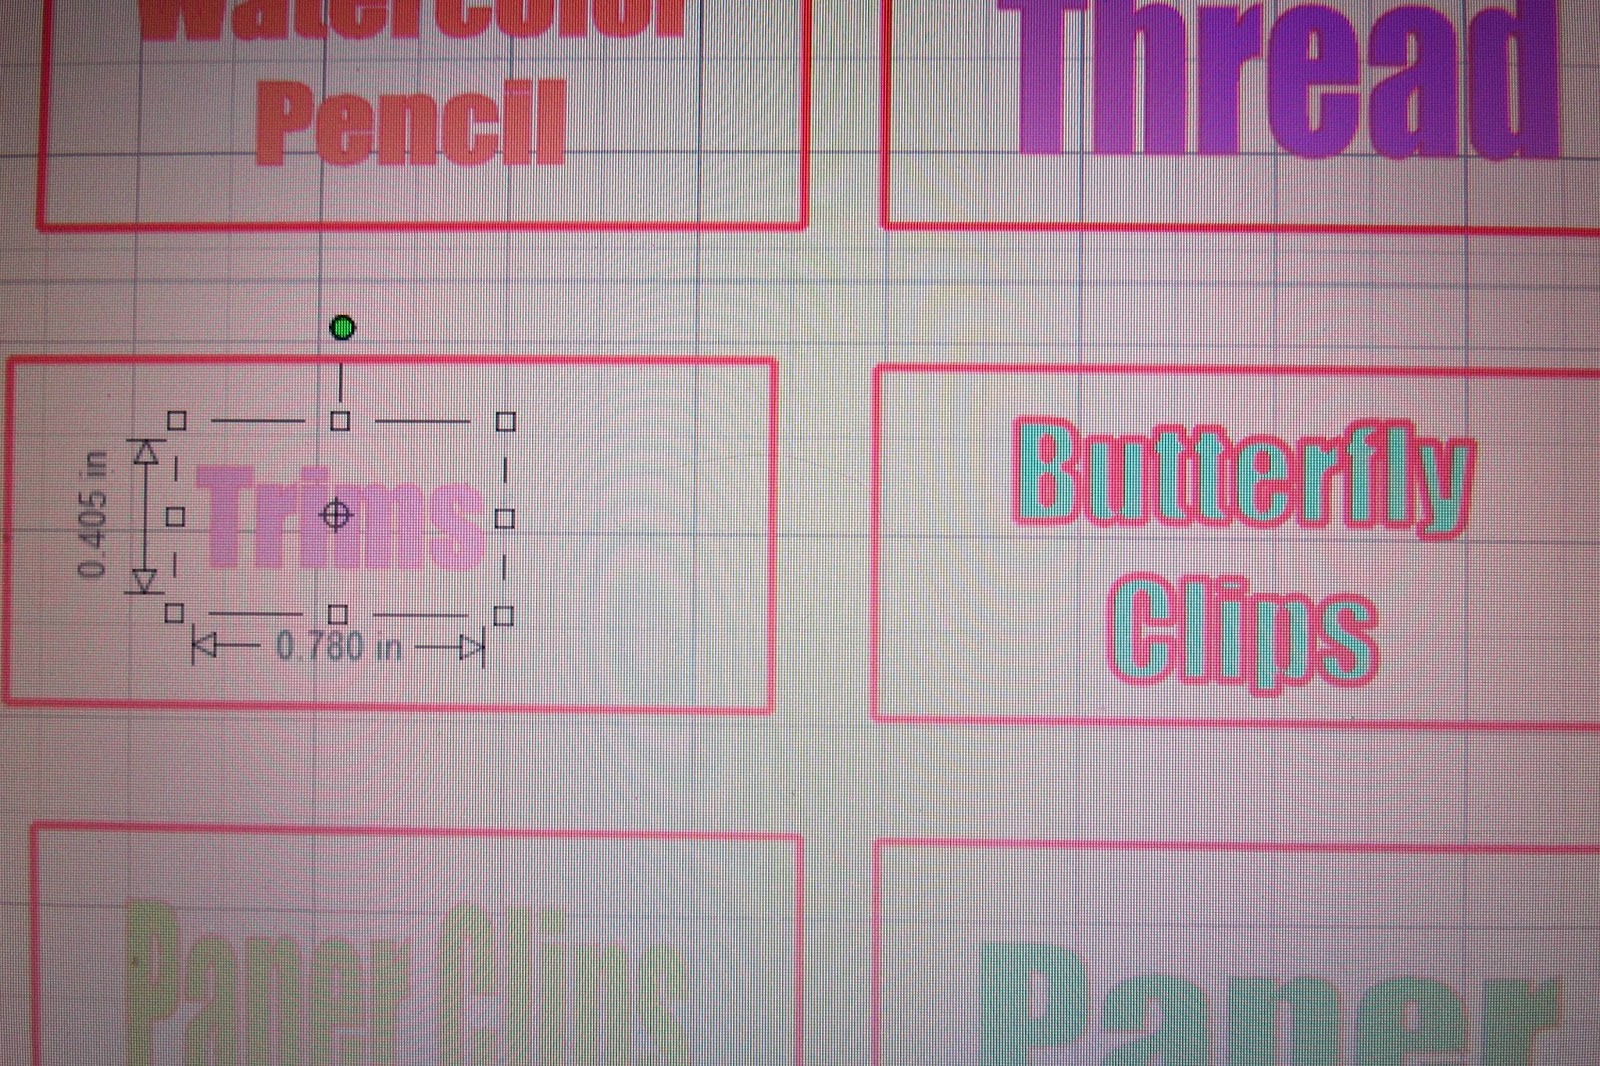

Highlight the word Trims, then click The Scissor Symbol, next click No Cut


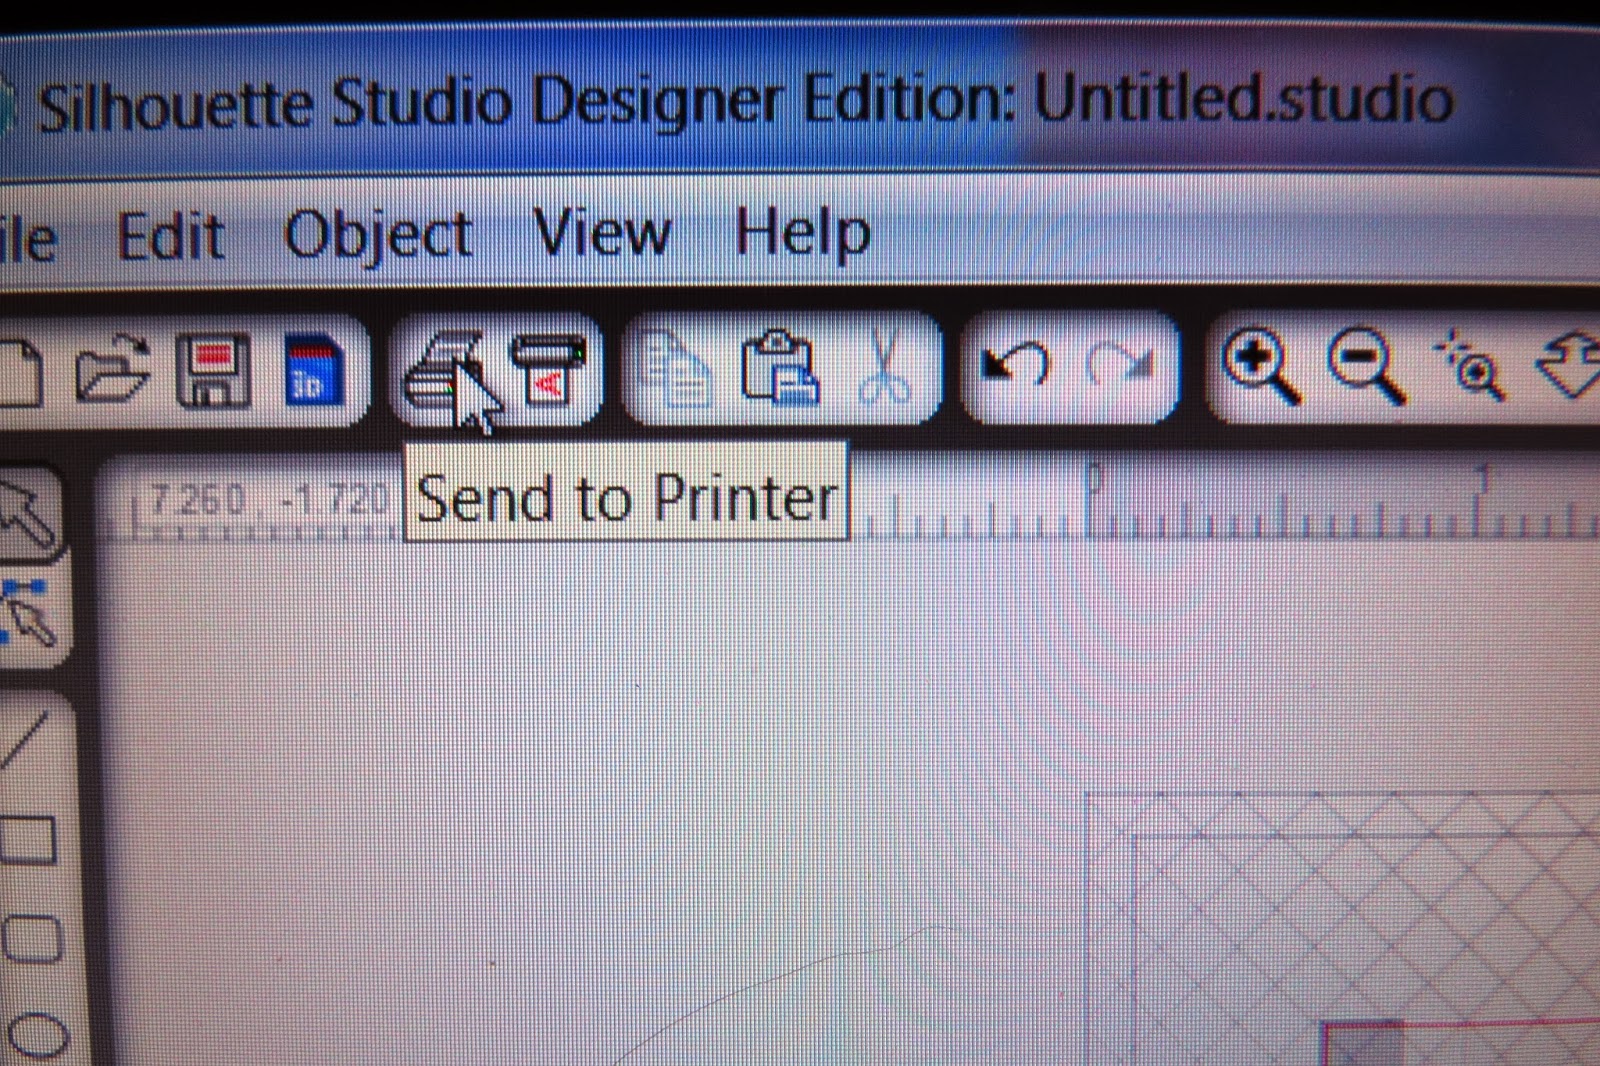
Make sure you have the registration marks on and send to printer

This picture shows what the registration marks
look like on the printed page.
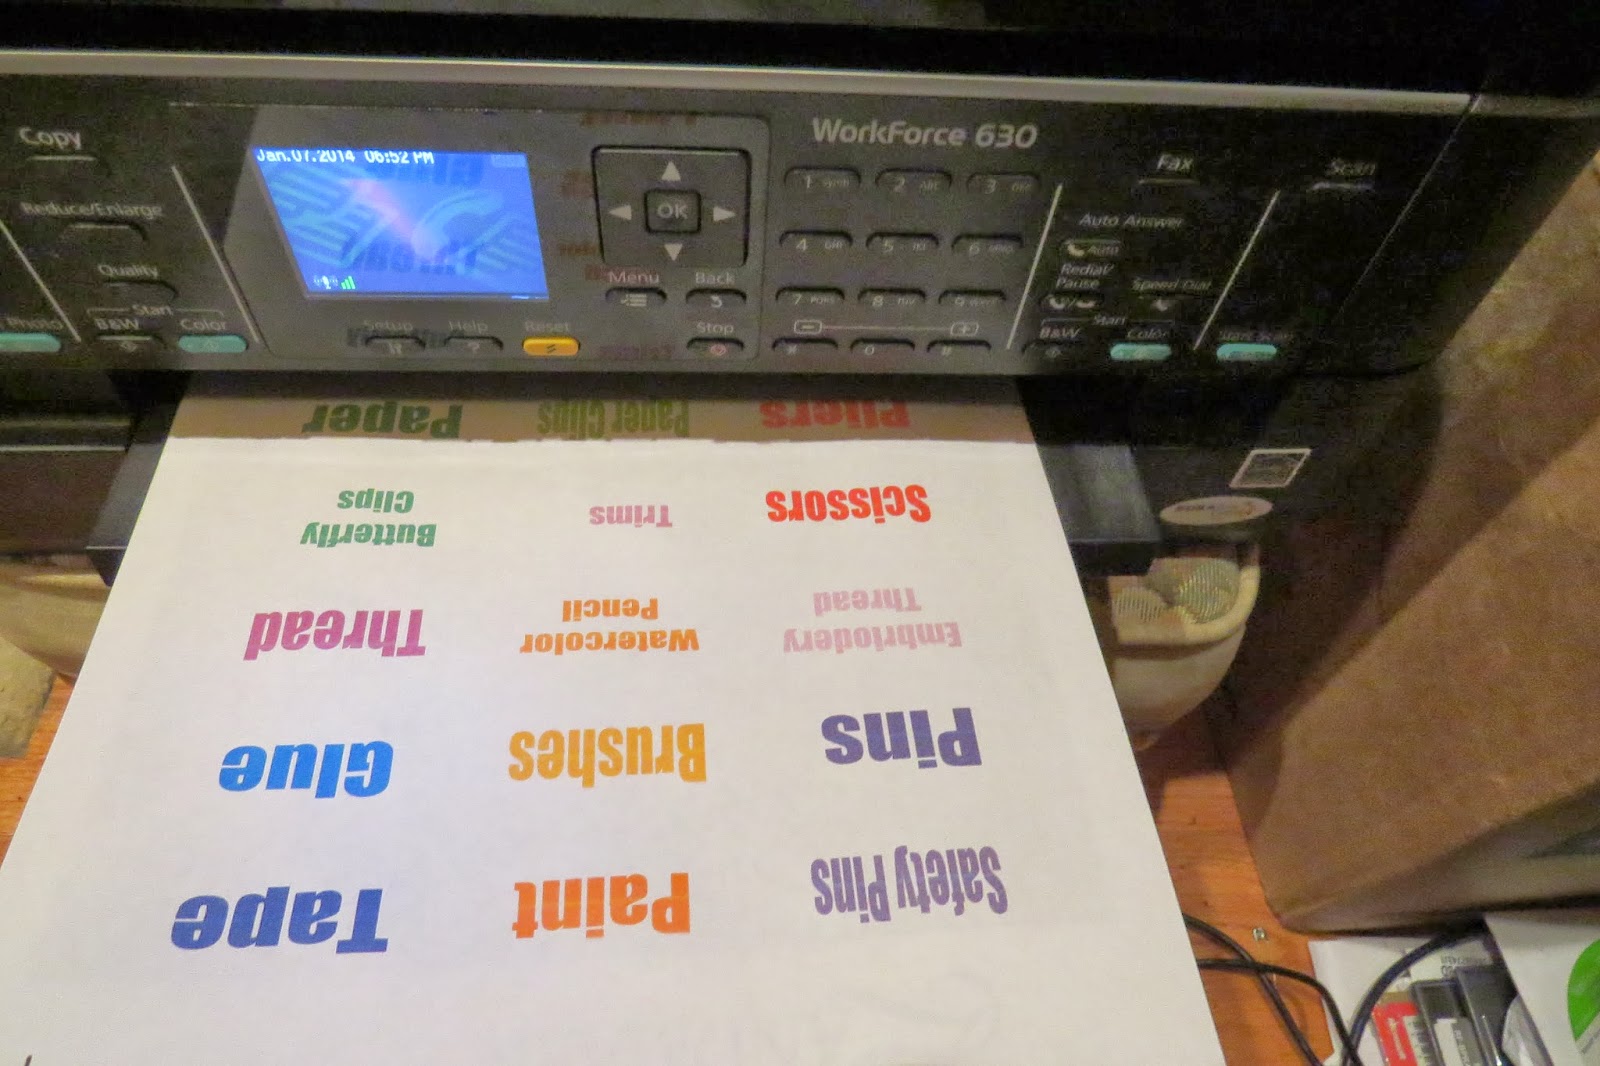
This is how the paper will look when it comes out of the printer

Set your paper to 8 1/2" X 11" place on your mat as pictured above
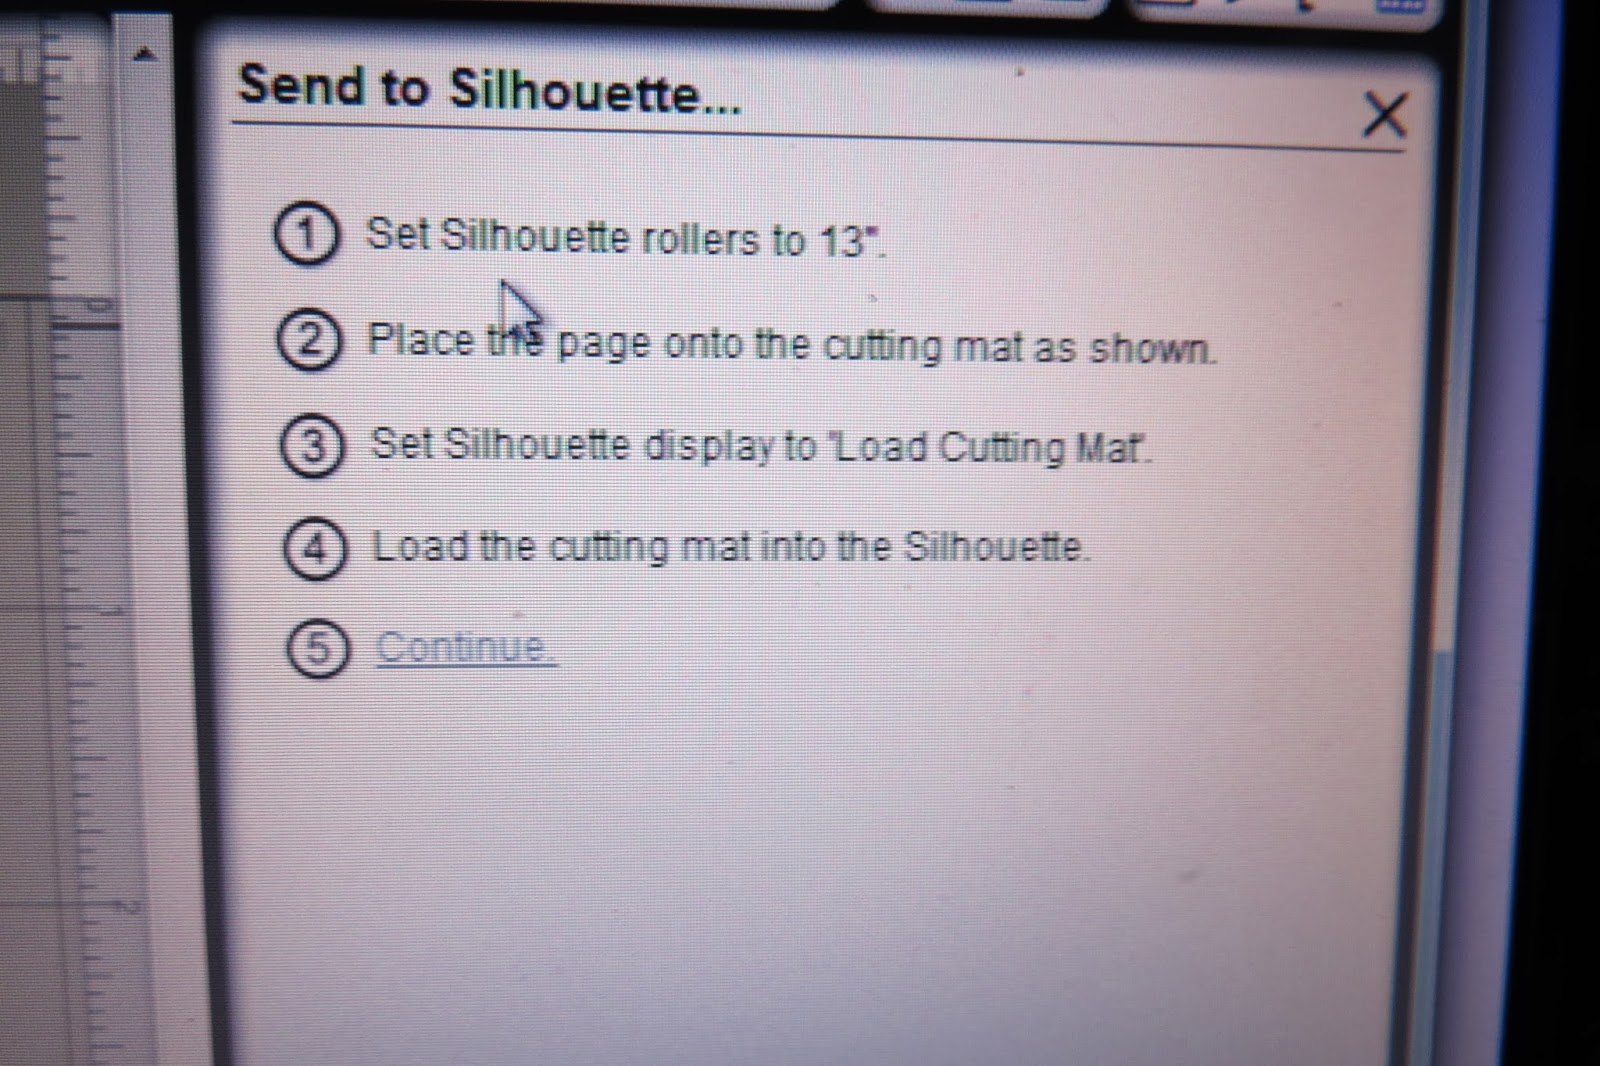
 Follow the directions on the screen.

This is a picture of the Cameo processing the cuts.
Set the blade to the right setting for the material you are cutting.
This is the way the labels look weeded.

 This is the promise of a new Craft room and the Start of a many friendships through Silhouette Challenge.
Thank you for joining me during this tutorial. I hope this helps you move towards trying a new project yourself. Please share your comments and thoughts with me because, I Love to here from my readers and blogger buddies.
On behalf of The Silhouette Challenge Team Welcome to 2014!
Each Month we will be presenting a wealth of ideas and information to help you use your Silhouette Cameo or Portrait.
Join Me in learning from 35 of my team members who posted to this Months Event!
This month we were asked to add a project which involved getting organized. This is the first event I am participating in since I am a new member of this group. I am honored to share this page with others who share a passion for learning, growing, sharing ideas, all while using my favorite item in my craft room The Silhouette Cameo. Heck I liked it so much I bought two.
Today I am sharing a new project I have never done before with you. I am just starting to design my craft room at my White Picket Fence Home. This is my first time using the my printer, with the registration marks, then cut with the Cameo. I have to say I am amazed at how this machine works.
Alright it is time for directions to success!!!!!
The first item on our list today is measure your length and width of the size of the labels you need. In my case the Recollection File Drawer is 2" wide and 1" high. Then I made one rectangle to these measurements. I hit fill page but felt that was to close for comfort, so I decided to leave a space between each label by duplicating and pasting to my desired page. This way even if I was off on the printing it would still leave room to cut around the labels.
I chose colors that coordinated so each type of supplies is easy to spot by color as well as words. here is the process in pictures.
This is how my page looked with rectangles and words typed in place. See below the screen has with the cut lines around the words Butterfly Clips. Since we do not want to cut these lines I have demonstrated the images to click on to remove theses cut line form the pattern.
This is how the paper will look when it comes out of the printer
Follow the directions on the screen.
Set the blade to the right setting for the material you are cutting.
This is the promise of a new Craft room and the Start of a many friendships through Silhouette Challenge.
Thank you for joining me during this tutorial. I hope this helps you move towards trying a new project yourself. Please share your comments and thoughts with me because, I Love to here from my readers and blogger buddies.
I chose colors that coordinated so each type of supplies is easy to spot by color as well as words. here is the process in pictures.
 This is how my page looked with rectangles and words typed in place. See below the screen has with the cut lines around the words Butterfly Clips. Since we do not want to cut these lines I have demonstrated the images to click on to remove theses cut line form the pattern.
 |
| Highlight the word Trims, then click The Scissor Symbol, next click No Cut |

 |
| Make sure you have the registration marks on and send to printer |


 |
| This picture shows what the registration marks look like on the printed page. |
 |
| Set your paper to 8 1/2" X 11" place on your mat as pictured above |


 |
| This is a picture of the Cameo processing the cuts. |
Set the blade to the right setting for the material you are cutting.
 |
| This is the way the labels look weeded. |


Thank you for joining me during this tutorial. I hope this helps you move towards trying a new project yourself. Please share your comments and thoughts with me because, I Love to here from my readers and blogger buddies.
On behalf of The Silhouette Challenge Team Welcome to 2014!
Each Month we will be presenting a wealth of ideas and information to help you use your Silhouette Cameo or Portrait.
Join Me in learning from 35 of my team members who posted to this Months Event!
January's theme is Organization

- DIY Window Shutter Mail Organizer by Weekend Craft
- Kids' Art Wall by Tried & True
- Organizing Silhouette and Craft Supplies by The Happier Homemaker
- Simple Recipe Organization by It's Always Craft Time
- Put a Label on it! Herb Names for Plant Stakes by Get Silvered
- Super Simple Linen Closet Labels by Two Purple Couches
- Beware of the Animals Vinyl Toy Box by A Tossed Salad Life
- Child desk accessories by Architecture of a Mom
- Organizing & the Important of Labels by The Turquoise Home
- Index Card Organizer for Easier Meal Planning by Chicken Scratch NY
- Create Craft Room Labels by Dragonfly & Lilypads
- Simple Storage Solution for your Christmas Ornaments by Vintage News Junkie
- Organize this: DIY Planner Covers, Tags & Dividers (made with Cereal Boxes) by Black and White Obsession
- How to Make a Cut File into a Print & Cut by Create & Babble
- Simple Chest Freezer Organizational Board by Nearly Handmade
- Vinyl Your Kitchen Canisters! by From Wine to Whine
- Nursery Closet Dividers & Silhouette Cut File by Creative Ramblings
- Make Custom Box Templates with a Silhouette for Drawer Organization by One Dog Woof
- Organizing the Craft Room by What's Next Ma
- Vinyl Wall Calendar by Crafts Cakes and Cats
- Personalized Toy Storage Bins by Lil' Mrs. Tori
- Personalized Routine Chart by Work in Progress
- Blog Planner Sheet Dividers + Free Cut Files by TitiCrafty by Camila
- Simple Project Calendar by Little Blue's Room
- Dry Erase Photo Frame Menu Board + Free Cut File by Essentially Eclectic
- Receipt Organization with Free Cut File by The Thinking Closet
- Cute and Easy Labels by Life After Laundry
- "What's For Dinner?" Menu Planning Board by unOriginal Mom
- Mixing Organization and Function: An Easy Conversion Chart by My Paper Craze
- Why do my cookies taste so bad? A lesson in baking. by The Life and Times of a TAP
- Custom Drawer Dividers by Please Excuse My Craftermath...
- The evolution of my labeling system by feto soap
- Ikea Drawer labels by McCall Manor
- Glass Etched Vinegar & Oil bottles by Terri Johnson Creates
- Organize It: Bathroom Closet by The House on Hillbrook
- Ombre Butterfly Magnet Board by Sowdering About
Crafting is always Better with Friends
Show your appreciation we are all volunteers
Please feel free to Share but,
always give the original post credit.
Blogging love is always accepted and appreciated,
You know the drill Click away!
Monday, February 10, 2014
Sweet Baby Love Quilt
It is time for another +Silhouette Challenge Fabric: I am going to learn right along with you as I cut fabric on my +Silhouette Cameo. I am making a baby quilt for my soon to be great niece or nephew. This decorator fabric was used at two of the baby showers for this new little one. I am the babies father's Godmother.
The design of the nursery is gender neutral, since the parents are waiting for the birth to find out Pink or Blue? We are all excited while feeling Blessed. The room is Pottery Barn Baby inspired with the colors yellow, white, gray, along with Elephants and Giraffes.

Which pattern or color do you think I used?
Next I got to work on my silhouette starting to look for a good image.

Found this but it needed some work to fit my plan?
Before cutting out my two simple images on the Cameo I purchase a fabric stabilizer.
The iron on +Pellon stabilizer will combine with the fabric to give enough body to the material, to be cut by the Silhouette. I chose iron on because it adds the stiffness with out making a seam edge to cut. I ironed it on first, let it cool and put the yellow fabric on the 12" X 24" cutting mat found the design I created changing the neck of the giraffe.
Oops! I followed the directions and this is how the first attempt turned out.

This is not what I plannedAs with any project sometimes we can run into bumps in the road. My bump was that the fabric did not cut all the way through, when I followed the directions. After an evening of sheer frustration, I looked on YouTube finding a tutorial from a trade show which suggested using the Heavy Card stock setting, I also used a slow speed of 1 then set my blade to 9.
 I used my Designer Studio addition to change the giraffe images to suit my design. I simply used a knife and cut the giraffes head off. Then I flipped it horizontal used the welding and then flipped it vertically.


After I weeded and removed the yellow fabric I followed the same process but used a gray fabric for the elephant.
 When I made all these changes plus eliminated the eyes and nose of the giraffe, I reached a successful outcome. I had considered giving up but, decided to fight past this bump. Now that I finally was able to achieve my vision,
I am happy with the results.
I bought a baby flannel in gray to finish the other side of the quilt. I will decide on how I will piece the quilt and finish the edges in another post. At this time I want to focus on the Silhouette Challenge by cutting the two animals. I will finish the quilt and share it with all of you very soon.

It is time for another +Silhouette Challenge Fabric: I am going to learn right along with you as I cut fabric on my +Silhouette Cameo. I am making a baby quilt for my soon to be great niece or nephew. This decorator fabric was used at two of the baby showers for this new little one. I am the babies father's Godmother.
The design of the nursery is gender neutral, since the parents are waiting for the birth to find out Pink or Blue? We are all excited while feeling Blessed. The room is Pottery Barn Baby inspired with the colors yellow, white, gray, along with Elephants and Giraffes.
Before cutting out my two simple images on the Cameo I purchase a fabric stabilizer.
The iron on +Pellon stabilizer will combine with the fabric to give enough body to the material, to be cut by the Silhouette. I chose iron on because it adds the stiffness with out making a seam edge to cut. I ironed it on first, let it cool and put the yellow fabric on the 12" X 24" cutting mat found the design I created changing the neck of the giraffe.
Oops! I followed the directions and this is how the first attempt turned out.
The design of the nursery is gender neutral, since the parents are waiting for the birth to find out Pink or Blue? We are all excited while feeling Blessed. The room is Pottery Barn Baby inspired with the colors yellow, white, gray, along with Elephants and Giraffes.
 |
| Which pattern or color do you think I used? Next I got to work on my silhouette starting to look for a good image. |
 |
| Found this but it needed some work to fit my plan? |
The iron on +Pellon stabilizer will combine with the fabric to give enough body to the material, to be cut by the Silhouette. I chose iron on because it adds the stiffness with out making a seam edge to cut. I ironed it on first, let it cool and put the yellow fabric on the 12" X 24" cutting mat found the design I created changing the neck of the giraffe.
Oops! I followed the directions and this is how the first attempt turned out.
 |
| This is not what I plannedAs with any project sometimes we can run into bumps in the road. My bump was that the fabric did not cut all the way through, when I followed the directions. After an evening of sheer frustration, I looked on YouTube finding a tutorial from a trade show which suggested using the Heavy Card stock setting, I also used a slow speed of 1 then set my blade to 9. |

I used my Designer Studio addition to change the giraffe images to suit my design. I simply used a knife and cut the giraffes head off. Then I flipped it horizontal used the welding and then flipped it vertically.


After I weeded and removed the yellow fabric I followed the same process but used a gray fabric for the elephant.

When I made all these changes plus eliminated the eyes and nose of the giraffe, I reached a successful outcome. I had considered giving up but, decided to fight past this bump. Now that I finally was able to achieve my vision,
I am happy with the results.
I bought a baby flannel in gray to finish the other side of the quilt. I will decide on how I will piece the quilt and finish the edges in another post. At this time I want to focus on the Silhouette Challenge by cutting the two animals. I will finish the quilt and share it with all of you very soon.I am happy with the results.

Want to Check Out More Silhouette Projects?
 My Silhouette Challenge buddies and I are all sharing projects on our blogs today, these projects below will provide a wealth of Silhouette inspiration!

My Silhouette Challenge buddies and I are all sharing projects on our blogs today, these projects below will provide a wealth of Silhouette inspiration!
Want to Check Out More Silhouette Projects?
My Silhouette Challenge buddies and I are all sharing projects on our blogs today, so peruse the projects below for a wealth of Silhouette inspiration! {Insert Photo Collage here.}
- No-Sew Valentine's Day Pillows by A Tossed Salad Life
- No-Sew Interchangeable Fabric Bunting by unOriginal Mom
- Monogrammed Burlap Garden Flag by The Turquoise Home
- Crawl, Walk, Bike by It's Always Craft Time
- Freezer Paper Stenciled Tote Bags by Weekend Craft
- DIY Bleach Spray Shirt by Practically Functional
- Stenciling Sherlock by Please Excuse My Craftermath...
- Felt Star Wands by Cutesy Crafts
- Yoda Kid's T-Shirt by Architecture of a Mom
- Mark Your Territory- Dog Flags by Black and White Obsession
- Nautical Pillows by Lil' Mrs. Tori
- Big Sister Gift & Silhouette Cut File by Creative Ramblings
- Nerdy Baby Onesies + Free Cut File by Essentially Eclectic
- Easy Easter Bunny Onesie - Silhouette Cameo Craft by Adventures in All Things Food & Family
- Fabric Envelopes for LEARNING LETTERS! (& cut file) by From Wine to Whine
- "Good Morning, Sunshine!" Memo Board by Tried & True
- Hearts-A-Lot Burlap Pillow Cover by My Paper Craze
- Baby Quilt by Dragonfly & Lily Pads
- Surprise Holiday Banner by Whats Next Ma
- "Team Betty" Tote Bag by The Thinking Closet
- DIY Sock Minion by Create it. Go!
- Pretty Up Some Organza Bags by Getsilvered
- Easy Heart Appliqued Onsies by Create & Babble
- Bleach Pen Gel & Freezer Paper Stencils Made with the Silhouette Machine by Bringing Creativity 2 Life
- Valentines Baby Onesie & Boy's Shirt + Free Cut Files by The Frill of Life
- Valentine's OWL Always Love You T-shirt by My Favorite Finds
- DIY Screen Printed Curtains by Chicken Scratch NY
- Fabric Painted Quilted Wall Hanging by Terri Johnson Creates
- Glitter Iron-On Top by Simply Kelly Designs
- DIY Monogrammed T-shirts with Silhouette Heat Transfer Material by Pitter and Glink
- Birthday Challenge by Fadville
- Machine Applique with SIlhouette Cameo by The Sensory Emporium
- Fabric Applique Valentine's Day T-Shirt by DailyDwelling
- "Cute as Cupid" shirt by crafts, cakes, and cats
- Sew Cute Applique by Life After Laundry
- Rhino Onesie by It Happens in a Blink
- Upcycled Birchbox Cameo Accesory Organizer by Cupcakes&Crowbars
- Customizing textiles with Heat Transfer Vinyl (working title) by feto soap
- Easy Fabric Art by McCall Manor
- Lady Bug Tote Bag with Silhouette Rhinestones by Ginger Snap Crafts
- Mommy and Em's Coordinated Aprons by TitiCrafty
- Canvas sketch project and a share by Clever Someday
- Foxy Lady Pajamas by Mabey She Made It
- Teddy Bear by Work in Progress
- My Silhouette Challenge buddies and I are all sharing projects on our blogs today, so peruse the projects below for a wealth of Silhouette inspiration! {Insert Photo Collage here.}
- No-Sew Valentine's Day Pillows by A Tossed Salad Life
- No-Sew Interchangeable Fabric Bunting by unOriginal Mom
- Monogrammed Burlap Garden Flag by The Turquoise Home
- Crawl, Walk, Bike by It's Always Craft Time
- Freezer Paper Stenciled Tote Bags by Weekend Craft
- DIY Bleach Spray Shirt by Practically Functional
- Stenciling Sherlock by Please Excuse My Craftermath...
- Felt Star Wands by Cutesy Crafts
- Yoda Kid's T-Shirt by Architecture of a Mom
- Mark Your Territory- Dog Flags by Black and White Obsession
- Nautical Pillows by Lil' Mrs. Tori
- Big Sister Gift & Silhouette Cut File by Creative Ramblings
- Nerdy Baby Onesies + Free Cut File by Essentially Eclectic
- Easy Easter Bunny Onesie - Silhouette Cameo Craft by Adventures in All Things Food & Family
- Fabric Envelopes for LEARNING LETTERS! (& cut file) by From Wine to Whine
- "Good Morning, Sunshine!" Memo Board by Tried & True
- Hearts-A-Lot Burlap Pillow Cover by My Paper Craze
- Baby Quilt by Dragonfly & Lily Pads
- Surprise Holiday Banner by Whats Next Ma
- "Team Betty" Tote Bag by The Thinking Closet
- DIY Sock Minion by Create it. Go!
- Pretty Up Some Organza Bags by Getsilvered
- Easy Heart Appliqued Onsies by Create & Babble
- Bleach Pen Gel & Freezer Paper Stencils Made with the Silhouette Machine by Bringing Creativity 2 Life
- Valentines Baby Onesie & Boy's Shirt + Free Cut Files by The Frill of Life
- Valentine's OWL Always Love You T-shirt by My Favorite Finds
- DIY Screen Printed Curtains by Chicken Scratch NY
- Fabric Painted Quilted Wall Hanging by Terri Johnson Creates
- Glitter Iron-On Top by Simply Kelly Designs
- DIY Monogrammed T-shirts with Silhouette Heat Transfer Material by Pitter and Glink
- Birthday Challenge by Fadville
- Machine Applique with SIlhouette Cameo by The Sensory Emporium
- Fabric Applique Valentine's Day T-Shirt by DailyDwelling
- "Cute as Cupid" shirt by crafts, cakes, and cats
- Sew Cute Applique by Life After Laundry
- Rhino Onesie by It Happens in a Blink
- Upcycled Birchbox Cameo Accesory Organizer by Cupcakes&Crowbars
- Customizing textiles with Heat Transfer Vinyl (working title) by feto soap
- Easy Fabric Art by McCall Manor
- Lady Bug Tote Bag with Silhouette Rhinestones by Ginger Snap Crafts
- Mommy and Em's Coordinated Aprons by TitiCrafty
- Canvas sketch project and a share by Clever Someday
- Foxy Lady Pajamas by Mabey She Made It
- Teddy Bear by Work in Progress
Monday, March 10, 2014
Monogrammed Gifts
I started making Monograms for gifts. I create them with my +Silhouette Cameo, scrapbook paper, glue, and my +Xyron Inc sticker machine. I Made them as gifts, which needed personal touches for each precious person. These were all given to my nieces, and nephews. Auntie Karen Marie had to add a special color, paper design, or some even have a nod to their nicknames.

All you need from the Silhouette portion of this project is right on this screen!
Did you know that you can print paper from your Silhouette? I was searching for paper with bears and stopped by Archiver's Scrap booking Store. (Sad this Company is now Closed) I asked a clerk, she was a delightful person, who showed me how you simply type bear paper in the Silhouette Cameo search box and hit enter. A few second later there was a paper that was perfect for my bear project. When I arrived home I added it to my cart, and a few seconds later, I printed it out on my printer at home on card stock.
I think it came out very successful.

 I wanted to show you here that I used a 6" x 6" frame on the top. When I was completing my gifts I ran out of those frames. Being a Creative Person, I adapted to what I had on hand, 9" x 9" frames for the remaining 3 frames. It does let me show you how you can get a different look by adding an additional background paper and foam tabs to lift the design off the page.
Of course my plan all along? LOL
How many of you have a Big Family? Now I mean BIG!
I love giving gifts to all my nieces and nephews but, when you have been blessed with enough to field more then two baseball or softball teams. Next mix in 3 great nieces, 6 great nephews, and an additional delivery is waiting to surprise us any day now?
Wow! I just realized we can field another team + One, I hope by now!

Each color and style of Font has been chosen for the room colors, personality, and gender. As you look at this picture above, you will notice the Letter mans Font from the +Silhouette Stores in the middle.

1. Here you see how I set up my page. I add the 6" x 6" Square first because it gives me the area I will need to work.
2. Then I select the Monogram Letters. The Center is the last Initial which I make larger then the first and middle. In this instance K is the last name initial, L is the first name, and M is the middle one.

3. The final step to set up my monogram project is to make another layer to add depth. To do this I Copy my letters and paste to page then line them up as shown. Move the individual letters and square off the page for a minute. Next I highlight and drag over the whole image in the bottom left of the screen and hit weld. Then you can drag it all back to be on one page again to save. Click save I used the persons name, it was easiest for me, then I could use this template for each layer.
 Now to create the layers you will need a Background, Welded and Three separate initials.
This is where I choose to through in each personality of the recipient of the gift.
Above is is an example of how I did this with the paper. First the background is paper with bug stickers for the nickname bug. Just lady bugs and fluttery bees did not fit this boy's personality but I needed bugs. The stickers worked out great and know my nephew has custom paper for his gift. I do wish I would have copied, and saved the paper with the bugs, as a image for future use though. Next time! In order to cut the layer I just moved the other items to the side and cut only the 6 x 6 inch section.
Next I moved over the welded layer into the page and slid out the background.
Layer number two is the welded layer, which I usually chose a subtle pattern.
This one is grass because that is where bugs live! Pretty corny I know. Ha Ha!
Then I move the welded section off to the side.
The final Layer is the individual letters. I like to make them all different paper patterns that compliment each other. I put one letter on at a time, because I am usually using small pieces of paper by now. I do not want the paper to get caught in the up machine.
I know, I could attach them all lined perfectly but, this is just my preference, after a few mishaps.
I glue the first and middle initials on then place the last initial on top to give it more importance.
Now to create the layers you will need a Background, Welded and Three separate initials.
This is where I choose to through in each personality of the recipient of the gift.
Above is is an example of how I did this with the paper. First the background is paper with bug stickers for the nickname bug. Just lady bugs and fluttery bees did not fit this boy's personality but I needed bugs. The stickers worked out great and know my nephew has custom paper for his gift. I do wish I would have copied, and saved the paper with the bugs, as a image for future use though. Next time! In order to cut the layer I just moved the other items to the side and cut only the 6 x 6 inch section.
Next I moved over the welded layer into the page and slid out the background.
Layer number two is the welded layer, which I usually chose a subtle pattern.
This one is grass because that is where bugs live! Pretty corny I know. Ha Ha!
Then I move the welded section off to the side.
The final Layer is the individual letters. I like to make them all different paper patterns that compliment each other. I put one letter on at a time, because I am usually using small pieces of paper by now. I do not want the paper to get caught in the up machine.
I know, I could attach them all lined perfectly but, this is just my preference, after a few mishaps.
I glue the first and middle initials on then place the last initial on top to give it more importance.
 TaDa! Three of the many Monograms I have made.
I have realized that I could have used no cut option on this project. I have learned that process since I made these for gifts. That is one of the great parts of life, we always have opportunities to keep learning. If you are wondering where frames came from it is one of my favorite stores +Michaels Stores. I hit half prices sales and stock up.
Until Next time........
~Let Your Creative Spirit Dance~
Please follow along with my Silhouette Challenge Friends have shared their posts today too!
.png)
1. McCall Manor // 2. The Turquoise Home // 3. Creative Savings // 4. Sandpaper and Glue // 5. The Thinking Closet // 6.Sowdering About in Seattle // 7. Persia Lou // 8. From Wine to Whine // 9. Dream a Little Bigger // 10. Please Excuse My Craftermath... // 11. Play. Party. Pin. // 12. Everyday Paper // 13. Practically Functional // 14. A Tossed Salad Life // 15. My Favorite Finds // 16. The House on Hillbrook // 17. Adventures in All Things Food // 18. A Glimpse Into Barb's Life// 19. TitiCrafty // 20. The Experimental Home // 21. feto soap blog // 22. Creative Ramblings // 23. The Stamp Doc // 24.Ginger Snap Crafts // 25. Simply Kelly Designs // 26. Whats Next Ma // 27. unOriginal Mom // 28. Bringing Creativity 2 Life // 29. Cutesy Crafts // 30. My Paper Craze // 31. Create & Babble // 32. Grey Luster Girl // 33. The Sensory Emporium // 34. Lil' Mrs. Tori // 35. Black and White Obsession // 36. Mama Sonshine // 37. Weekend Craft // 38.Creative Carnival // 39. Peace, Love and Joyce // 40. Tried & True // 41. The Frill of Life // 42. Dragonfly & Lily Pads // 43.Get Silvered // 44. Minted Strawberry
I started making Monograms for gifts. I create them with my +Silhouette Cameo, scrapbook paper, glue, and my +Xyron Inc sticker machine. I Made them as gifts, which needed personal touches for each precious person. These were all given to my nieces, and nephews. Auntie Karen Marie had to add a special color, paper design, or some even have a nod to their nicknames.
Did you know that you can print paper from your Silhouette? I was searching for paper with bears and stopped by Archiver's Scrap booking Store. (Sad this Company is now Closed) I asked a clerk, she was a delightful person, who showed me how you simply type bear paper in the Silhouette Cameo search box and hit enter. A few second later there was a paper that was perfect for my bear project. When I arrived home I added it to my cart, and a few seconds later, I printed it out on my printer at home on card stock.
|
| All you need from the Silhouette portion of this project is right on this screen! |
I think it came out very successful.


I wanted to show you here that I used a 6" x 6" frame on the top. When I was completing my gifts I ran out of those frames. Being a Creative Person, I adapted to what I had on hand, 9" x 9" frames for the remaining 3 frames. It does let me show you how you can get a different look by adding an additional background paper and foam tabs to lift the design off the page.
Of course my plan all along? LOL
Of course my plan all along? LOL
How many of you have a Big Family? Now I mean BIG!
I love giving gifts to all my nieces and nephews but, when you have been blessed with enough to field more then two baseball or softball teams. Next mix in 3 great nieces, 6 great nephews, and an additional delivery is waiting to surprise us any day now?
Each color and style of Font has been chosen for the room colors, personality, and gender. As you look at this picture above, you will notice the Letter mans Font from the +Silhouette Stores in the middle.
1. Here you see how I set up my page. I add the 6" x 6" Square first because it gives me the area I will need to work.
2. Then I select the Monogram Letters. The Center is the last Initial which I make larger then the first and middle. In this instance K is the last name initial, L is the first name, and M is the middle one.
3. The final step to set up my monogram project is to make another layer to add depth. To do this I Copy my letters and paste to page then line them up as shown. Move the individual letters and square off the page for a minute. Next I highlight and drag over the whole image in the bottom left of the screen and hit weld. Then you can drag it all back to be on one page again to save. Click save I used the persons name, it was easiest for me, then I could use this template for each layer.
I have realized that I could have used no cut option on this project. I have learned that process since I made these for gifts. That is one of the great parts of life, we always have opportunities to keep learning. If you are wondering where frames came from it is one of my favorite stores +Michaels Stores. I hit half prices sales and stock up.
Wow! I just realized we can field another team + One, I hope by now!

1. Here you see how I set up my page. I add the 6" x 6" Square first because it gives me the area I will need to work.
2. Then I select the Monogram Letters. The Center is the last Initial which I make larger then the first and middle. In this instance K is the last name initial, L is the first name, and M is the middle one.
3. The final step to set up my monogram project is to make another layer to add depth. To do this I Copy my letters and paste to page then line them up as shown. Move the individual letters and square off the page for a minute. Next I highlight and drag over the whole image in the bottom left of the screen and hit weld. Then you can drag it all back to be on one page again to save. Click save I used the persons name, it was easiest for me, then I could use this template for each layer.

Now to create the layers you will need a Background, Welded and Three separate initials.
This is where I choose to through in each personality of the recipient of the gift.
Above is is an example of how I did this with the paper. First the background is paper with bug stickers for the nickname bug. Just lady bugs and fluttery bees did not fit this boy's personality but I needed bugs. The stickers worked out great and know my nephew has custom paper for his gift. I do wish I would have copied, and saved the paper with the bugs, as a image for future use though. Next time! In order to cut the layer I just moved the other items to the side and cut only the 6 x 6 inch section.
Next I moved over the welded layer into the page and slid out the background.
Layer number two is the welded layer, which I usually chose a subtle pattern.
This one is grass because that is where bugs live! Pretty corny I know. Ha Ha!
Then I move the welded section off to the side.
The final Layer is the individual letters. I like to make them all different paper patterns that compliment each other. I put one letter on at a time, because I am usually using small pieces of paper by now. I do not want the paper to get caught in the up machine.
I know, I could attach them all lined perfectly but, this is just my preference, after a few mishaps.
I glue the first and middle initials on then place the last initial on top to give it more importance.

TaDa! Three of the many Monograms I have made.
I have realized that I could have used no cut option on this project. I have learned that process since I made these for gifts. That is one of the great parts of life, we always have opportunities to keep learning. If you are wondering where frames came from it is one of my favorite stores +Michaels Stores. I hit half prices sales and stock up.
Until Next time........
~Let Your Creative Spirit Dance~
Please follow along with my Silhouette Challenge Friends have shared their posts today too!
.png)
1. McCall Manor // 2. The Turquoise Home // 3. Creative Savings // 4. Sandpaper and Glue // 5. The Thinking Closet // 6.Sowdering About in Seattle // 7. Persia Lou // 8. From Wine to Whine // 9. Dream a Little Bigger // 10. Please Excuse My Craftermath... // 11. Play. Party. Pin. // 12. Everyday Paper // 13. Practically Functional // 14. A Tossed Salad Life // 15. My Favorite Finds // 16. The House on Hillbrook // 17. Adventures in All Things Food // 18. A Glimpse Into Barb's Life// 19. TitiCrafty // 20. The Experimental Home // 21. feto soap blog // 22. Creative Ramblings // 23. The Stamp Doc // 24.Ginger Snap Crafts // 25. Simply Kelly Designs // 26. Whats Next Ma // 27. unOriginal Mom // 28. Bringing Creativity 2 Life // 29. Cutesy Crafts // 30. My Paper Craze // 31. Create & Babble // 32. Grey Luster Girl // 33. The Sensory Emporium // 34. Lil' Mrs. Tori // 35. Black and White Obsession // 36. Mama Sonshine // 37. Weekend Craft // 38.Creative Carnival // 39. Peace, Love and Joyce // 40. Tried & True // 41. The Frill of Life // 42. Dragonfly & Lily Pads // 43.Get Silvered // 44. Minted Strawberry


No comments:
Post a Comment