Wood Cake Topper With Cricut Knife Blade

Thursday, May 24, 2018


Wood Cake Topper with Cricut Knife Blade

Good morning Darlings it is a fun day today. We are using WOOD as our Craft Lightning material and I am excited to use my new Cricut Knife Blade. The good news is, the blade cuts through 1/16th Basswood like butter. Lets hang out together for 15 minutes while I show you how to make your own cake topper which is as easy as pie

15 Minute Wood Cake Topper for any event. This one is for my sons upcoming nuptials

"Favorite" Silhouette Challenge

Monday, July 14, 2014

   
  This "Favorite"Silhouette Challenge is one I have been waiting to share with you. I had this project waiting in the wings.  A family emergency kept me from completing my design for an earlier challenge this year.
Supplies, Scrapbook paper, Cordless Glue Gun, Wire Cutters, Sisal,  Twigs, Styrofoam, Floral Wire, Burlap
   List of Supplies, 

Daybeds inspired by Ana White

Saturday, November 2, 2013

     I have to thank +Ana White for her terrific free plans for the beds my husband built. Each Winter we plan projects for inside our lake house. My husband wanted to build beds for our lake home. I searched everywhere I could think of  to find solid economical beds with storage, when I found Ana White's plans for a twin size daybed with storage. It has six storage cubes in each bed which gave me room to store linens on one side and a space for each guest to store their belongings while they visit. The design was perfect for our guestroom at night and a game room during the day. Please follow this link to get her plans, check out her site, and while you are there she has plenty of plans for many projects.
http://ana-white.com/2009/12/plan-stratton-daybed-as-request-by-you.html
 First we studied her list, changed the wood to oak sanded plywood, because we planned on staining it with Minwax Stain and Sealer(Ebony), and Ana painted the bed White. Then we added up what wood we needed for two beds, which was easy because instructions included a detailed cut pattern. We purchased the oak sanded plywood from Home depot for the body of the bed, and the facing was oak as well.
  I was concerned about keeping the cost to a down. After giving the design a bit of thought I realized we could save even more money if we bought the cheaper pine sanded plywood for the inside of the cubes. The pieces that we cut out of sanded pine plywood included: Three bottom cuts, 4 sides of boxes, and 3 center cuts for each
Look at the cube in the background and top of bed on table.
Original Design complete
  My husband followed Ana White cuts, supplies lists, and directions exactly on the first bed. We changed the cut pattern on the second bed to the make cutting, staining and painting easier. We tried making the top on this bed one piece of wood instead of three separate pieces. This way my husband was able to paint the bottom or inside of the cubes Oatmeal on the inside and stain Ebony on the top, ends and facing.

Close-up of bed 
The beds made but the room is not yet complete.
You can see the daybeds in our guest /game room.
I added pillows that  I made to ones I purchased. I also bought Colonial Mills round baskets to add colorful  storage. I am still working on the bedding and decor of this room. I post more pictures later when I finish the guest/game room. I think Ana White will be proud my husband made these beautiful daybeds using her plans. We already had some guest stay over they gave the beds rave reviews. Please Leave a comment to let me know what you think of the beds or about Dragonfly & Lily Pads. Thank you again to Ana White for the wonderful plans hop on over and check out her site too.

That's Entertainment

Thursday, October 24, 2013


   We had been searching for a entertainment center for our great room at the lake house. I found the perfect one, except for the $$$$. It had white framing with the top, drawer, cabinet fronts, and legs in different stains of wood, with mismatched hardware. I scoured the Internet to find a deal or a substitute, but it wasn't comparable in structure or materials even though I met one goal of lowering the price.
  At a local antique store I scored this marked down buffet. It  was the answer to my entertainment center quest within my budget. It had a few blemishes but seeing past the issues was my vision of our entertainment center.
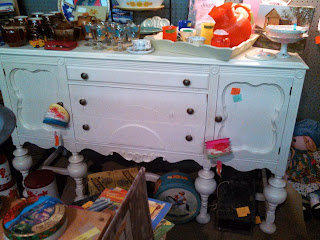
Before

After checking my supplies, I made a list of items I didn't have in my stash from other projects. I drove to our nearby Lowe's, which is a good resource for gaining knowledge, and bought my supplies. I began the process of  removing the knobs and hinges, taking  care to mark them because the wrong one may not fit properly. 
Next I sanded the top, doors, and center drawer front until all the paint was removed, and then the remainder of the buffet enough to rough up the surface to paint . We measured the opening for each shelf. My husband cut two shelves from oak plywood with his table saw, then drilled a hole through the back of the buffet between the two shelves for the cords. I used my new iron for the first time to iron on the oak facing to the shelves. Then I used Ebony stain(top), walnut stain(doors)and drawer front. Tape off the edges to insure clean lines to paint the frame, shelves, interior and legs with Linen paint.
After
  I was able to use this piece of furniture to blend the colors of wood
in my other furnishing throughout the space and
compliment the white painted trim in our home.  

Now That's Beautiful Entertainment!

Supplies                                                         @ Home Stash
Veneer facing Roll                                          Paint brushes
Black & Decker Orbital Sander                      Minwax Stain and Sealer
Sandpaper 80, 120 & 220                               Oak Veneer Plywood
Sanding Sponge Blocks fine grade                  Painters Tape
Latex gloves 
1 Quart Linen Paint                                                                                                                                                                          
These purchases proved to be such a mess, I switched to the sander
disposing of all these products;
Chip Paint Brushes, Rubber Gloves, Scrapper, Metal Bucket,
 Natural Paint Stripper

I look forward to your comments, please share your ideas too.