Create 3D Art with Print, Cut and Draw Features of Cricut

Sunday, May 12, 2019

 Craft and Create with Cricut 

Today is a big day for many reasons. You will be treated to eight new craft projects using a Cricut to make flower themed crafts and decor from the Craft and Create with Cricut Challenge. Below you will find my quick 3D Art print, cut and draw project. Please be sure to read all the way to the end where you will find 7 more crafts you will certainly want to Pin to one of your Pinterest Boards.


Make 3D Art quickly using Print, Cut, Draw Features with your Cricut Maker.

Life can be crazy

During the last year my family suffered several severe health scares. We also celebrated engagements, our son's wedding and most recently our Godson was married in April. In Between the excitement shortly before Thanksgiving while ice skating  I suffered a broken leg. As I say my leg pirouetted and I did not causing a spiral fracture requiring surgery. Now I am still recovering from becoming a human tripod for several months but the prognosis is good. It is just a slower process than I expected. Which is why it is so important to stop and take in the beauty of the world around us. Last year my own personal journey of twist and turns is inspiration for this cute little 3D art print.

How to make a 3D Art project using glue pads Draw Feature along with Print and cut using your Cricut Maker


Supplies

1. Printer
2. Cricut Maker or Explorer
3. Shadow Box Frame 6 X 6 (opening for art)
4. Glue Pads 
5. 20 lbs. Copy Paper or Scrapbook Paper (remember it must fit in your printer
6. Cricut Spatula (recommend to prevent curling)
7. Light tack Mat from Cricut

Some ot the Supplies used to make a fast 3D Art Decor with your Cricut Maker


Steps

After you gather your supplies place your paper in your printer. When your Cricut prompts you to print select your printer and then press print. 
The printing is complete simply place the paper in your upper left hand corner of the light grip mat. follow the prompts on your Cricut screen.
Next release the mat from your machine, using the spatula suggested gently lift the paper and fresh cut flowers in the Ball jar to set aside.


Cricut Maker making quick work of the print and cut feature.

Now place a second piece of 20 lb copy paper on a light grip mat to draw. Be sure to add a fine print black pen to A for the draw portion, B should have a blade to cut out your background. again follow the prompts on your computer or tablet to complete this step. 
Remove the same way you did above.
Open frame back/
Place glue tabs on back off  Ball Jar Flowers.
Arrange the way you like.
Place your 3D Art in the frame, close the frame and enjoy. 
The frame I purchased is a Shadow Box Frame which comes in many sizes.

Love it, Pin It

Stop and Smell the Flowers 3D Art project made quickly with a Cricut Maker and a Printer.

I am thrilled to be back sharing projects you can create. This is a quick one which will be perfect for hostess, teachers, thank you, Mothers Day gifts or a cute spot of decor in your home. Please be sure to visit, Pin, and share the 7 additional creative bloggers who shared their talent with us today. Their links are conveniently listed directly below. 

Let Your Creative Spirit Dance,
Karen Marie

  Pinterest   Facebook  Twitter   Instagram   BlogLovin


8 Flower Ideas made with Cricut for the May Create and Craft with Cricut Challenge


EasyPress 2 Heats Things up with Cricut

Friday, September 21, 2018

Sponsored Post

EasyPress 2 Heats Things up with Cricut

Hello Darlin! This week Cricut provided me with a new EasyPress 2 Medium (9X9) to create a project within Design Space using their StrongBond Iron-on. One of my favorite ways to decorate during the colder months is snowflakes. Lets see how easy peasy this project will be for you to recreate.


Since the EasyPress 2 is heating up even faster than ever it had me thinking the opposite direction. Winter! My favorite gift or decor item for Winter is snowflakes or snowmen. These delicate one of a kind gems glisten through the sky making even the gloomiest of day sparkle. The snowflake pillow project material and directions are located here in Design Space

Dragonfly & Lily pads contains Affiliate Links to the items used in this blog post. When you purchase through the convenient links we will receive a small percentage of the sale with no additional cost to you. 

Supplies
 

Cricut StrongBond SportsFlex Iron-On Metallics Sampler
12X12 Green Cutting Mat
Fabric of your choice or pre-made Pillow Cover 
(amount and size will vary with your pillow. This was 12X12)
EasyPress 2 9X9 or Medium
EasyPress Mat size?
Sparkling Snowflake Layered Card(#ME2F767) Anna's Christmas Card
Weeding Tools


While using Design Space from Cricut take it a step further to check your design by using the patterns for backgrounds even if you're not printing. Look at the realistic image that was created to assure your choices during the process. 


Anna Griffith designed a beautiful snowflake layered card, a perfect way to show you how easy it was to adapt a Design Space project into a different project. With her design I used one layer sliced off the card, deleted the score line and changed the size into a square.  Strongbond Iron-0n metallic is a the perfect way to add decor to a pillow.  It is guaranteed for 50 washings when used as directed.


Cricut produced a new EasyPress 2 which heats up faster with the new ceramic coated plate creating even heat for perfect projects. Speaking of surface the holder has a new easy to rest shape and I haven't even shared the best part yet. The EasyPress 2 comes in three sizes, S (6 X 7 ), M (9X 9), L (12 X 10). It has a USB port for easy updating, a sweet raspberry color, and the temperature raises up to 400 F. 


Come back each month for a new pillow cover design totalling 12 for the year. Storing 12 pillow covers is far easier than storing 12 different pillows. Keep reading to see what design is used for the next month. Also watch for a tutorial for easy to sew pillow covers out of your favorite fabrics, then you will be able to create right along with me. Please tag me on Instagram so when you create your pillow cover I will head over to comment on your project. Fly on over to follow Dragonfly & Lily Pads FaceBook Page where I will feature your pillows with credit to you.

I hope you enjoy the project please Pin, Pin, Pin!


The best part of this monthly post is all designs will be linked to the Cricut Design Space for easy access to create the project yourself. Join me in October for the next pillow cover creation.     

        Pinterest   Facebook    Google +  Twitter   Instagram   BlogLovin

~ Let Your Creative Spirit Dance  ~ 
                                                     Karen Marie


https://tap.fit/r1hzVihu7

Golden Dodecagon Votive Candle

Sunday, July 15, 2018

Golden Dodecagon Votive Candle

Today is the day when several bloggers join in a Craft and Create Challenge of the month. This month the theme is use your imagination. A few month ago this Dodecagon was made out of a cereal box. My soon to be daughter in law was pricing these votives for the wedding. $$$$$ The test project proved to be an cost effect design for decor for the wedding day.

Supplies

Metallic 12" X 12" Cardstock
Tiny Zots
Cricut Mat
Cricut Design Space
My Cricut Design Space has Dodecagon Votive and shapes.
Matte Gold Acrylic paint
Paint Brush
Battery Operated Candle
Cricut Maker


Above is an example of your computer screen while cutting and scoring in one setting using the Cricut Maker.


The scoring lines along with crisp cuts make an easy quick process to complete the craft. This project is not in my While in my craft room I cut the votive candle then brought them with me on the weekend.  Where is your favorite place to craft and create?  I love creating at the lake house. Please visit our Summer lake house tour. I am sure you will agree.

An easy way to bend straight tabs with the card stock my tip is to use your Cricut scrapper.


Once you fold all your angles become clear. I used double sided tape which fell apart from the heat and humidity the first one I assembled. This turned out to be a gift since I dry brushed the white interior with a matte gold then used tiny Zots to complete. The Zots worked much better and the brushed matte gold amped up the presentation of the votive.

AA few months ago cereal boxes proved to be a testing ground for making Dodecagon votive. For detailed directions follow this link to the tutorial.  It has a strong structure for battery operated candles. The price on one of these votives is costly out of metal painted gold. Each votive cost no more than two dollars with the battery operated candle.That is quite a savings!

Imagine the many parties you could use this Dodecagon Votive Candle Holder.
Below is a Pinterest image to include on your boards.


Lets Get Social
            
        Pinterest   Facebook    Google +  Twitter   Instagram   BlogLovin

~ Let Your Creative Spirit Dance  ~ 
                                                     Karen Marie

Be sure to visit my crafty & creative friends. I hope you enjoy the projects and Pin, Pin, Pin!


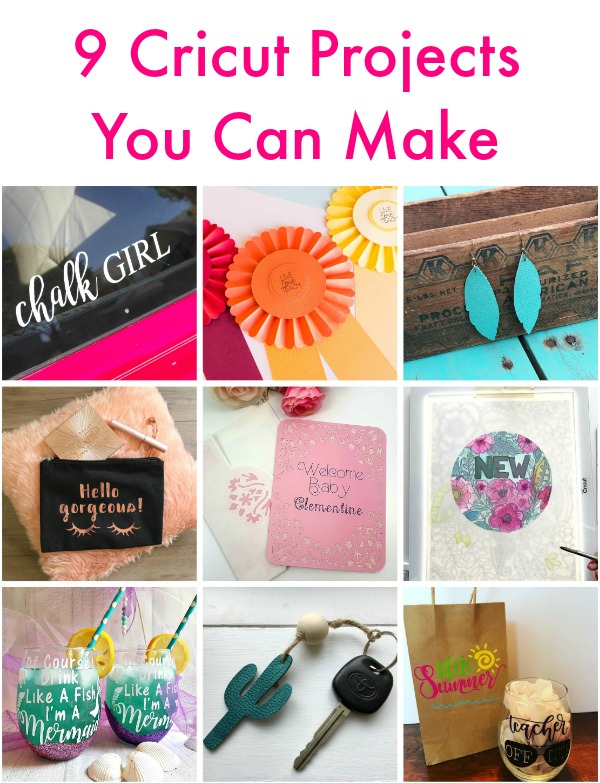
How  to Use Cricut for Branding - Create & Babble ⋅ Faux Leather Cactus Key Chain - Real Girls Realm ⋅ Teacher Award Ribbons - seeLINDSAY ⋅ Decorated Gift Bags with the Cricut Maker - Cookies, Coffee and Crafts ⋅ How to Make Leather Earrings - Refresh Restyle ⋅ Hello Gorgeous Makeup Bag - The How-To Home ⋅ How to use a lightbox for tracing - Smiling Colors ⋅ Personalized Baby Girl Cricut Card - The Inspiration Vault ⋅ Mermaid Glitter Wine Glasses - Daily DIY Life

Wedding Tote Created with Cricut EasyPress

Monday, July 9, 2018

Wedding Tote Created with Cricut Easy Press

 Keeping your things organized during the day of the wedding while looking graceful, calm and put together is no small feat.  During the shower for my son's fiance' I gave her mom a tote with the Mother of The Bride pressed in Sportflex iron on matte gold after creating the design on Cricut Design Space.


Double Duty Desk made with PureBond

Saturday, June 30, 2018


Double Duty Desk made with PureBond

PureBond sponsored The Fab Furniture Flipping Contest to showcase uses for their project panels called the One Panel Challenge. We were each given $50.00 Gift Certificate to Home Depot to purchase our Purebond choices and supplies.

Double Duty Desk made with PureBond One Panel Challenge

Many of you already know recently my first room in my life has closets filled with craft supplies. One of the biggest problems in this room is surface space to work but also collapse for guests to sleep when visiting.  The solution I came up with was to create an additional fold down surface which I could flip up for projects yet fold down for computer work or room for our guests.
Vintage Desk with light wax finish sanded for prep during One Panel Challenge from The Fab Flippin Furniture Contest Sponsored by PureBond

The prep work began in our backyard by sanding off the top finish of the desk. The top felt very smooth which caused me to suspect a waxed finish. 

Sanding with 120 and 220 sand paper to prepare desk for double duty finish.

 My suspicion was confirmed as you can see the white of the wax as I was sanding. Luckily the finish was thin leaving a beautiful wood surface after using 120 and 220 sanding paper in that order to ready the top for paint.

PureBond Hardwood Plywood Panel provide for One Panel Challenge cut to size and sanding.

The next step was to measure the top and then create the same size cuts to the PureBond Project Panel. Notice how close the top looks to the cut Purebond after the same sanding process. Adding the hardware on the ends prevents me from adding trim to compliment the routed edge on the desk. Sanding the edge to a soft rounded edges and corners gave me the look needed to blend the old and new.

Painting with Rust-Oleum  Ocean Mist spray paint for Double Duty Desk

I had ocean mist spray paint on hand in my stash and the color is a great blend to the color scheme in the craft room.

Everbilt Non-Mortise Hinges and Right and Left Lid Hinges with Safety stop.

The surface needed to be level when opened without a gap located in the center from the hinges. Another consideration was how to hold the top up secured when opened. For this part of the project thinking out of the box was key. There is no room under the desk to place the support in the center top.The lid support hinges work great since they work on the ends of the desk and top.

Everbilt Non Mortise hinges combine new PureBond One Panel Challenge with Vintage Desk

A great hint to screw in the hinges is turn the desk upside down on a level surface and line up the two tops. Then align the hinges and screw in to both the desk and PureBond Hardwood Plywood. This photo shows the age of the desk. I love the way the new PureBond blended seamlessly with the vintage desk.

Double duty desk with top folded down to save space during computer work.

Yes this vintage desk is wearing its character with cracks and age. By adding the PureBond flip up top this piece of furniture has been updated in color as well as a solving my surface problem. Now This vintage desk still adds the character to my craft room since Purebond provided an affordable strong project panel furniture finish plywood to add to this quality finish furniture piece will stand the test of time. 

Top of the new PureBond additional surface space with Double Duty Desk made with PureBond One Panel Challenge

 Above the hinge locks in place until you push it in and down. This is where I  noticed my shopping mistake. I grabbed two right handed hinges but needed a right and left handed hinge for each side of the desk. A quick exchange made by my Prince Charming and I was back on track.

I hope you loved this project. Please share and pin to save for your reference. When you build a PureBond One Panel Project tag me on Instgram

Double Duty Desk made with PureBond #OnePanelChallenge
I am thrilled with the double duty desk made for the PureBond One Panel Challenge. Purebond hardwood plywood allows a fine finish at an affordable price point with outstanding quality.

Lets Get Social
              Pinterest   Facebook    Google +  Twitter   Instagram   BlogLovin

~ Let Your Creative Spirit Dance  ~ 
      
                                                     Karen Marie